Saturday, July 14, 2012

Final Project: Mood Painting


This is my matte painting. Here I present a realistic apocalyptic hide out. The scenerio was turned into a bloody battle where defense is been taken near this house. A lot of painting and blending modes and layer styles were applied using this. Trail and error occured first as i tried to change the sky into something different. When using a channeled layer to try to removed did not work
successfully. With that done not working I decided to work with the lighted sky I had and added a sun shine come it going through the gaps between the trees. A brush set to dissolve was used then fiitered with a radius blur. To make lighting real on the painting I brightened the side of the house where was hit along with the rocks and made the other side darker. Painting on the rocks was done were I added extra green for agedness and blood for décor. The hole in the house was also done as a it was it an extra exit out to defend the lines. After painting the hole I added a layer style to make it pop out more. And extra cracks, stains, and blood were added to the house for more décor. The wall you see at the front is a barrier to hold of trespassers for a while. I painted more stains and blood on this barrier. Many adjustment layers were used to get a decent looking scene.

Sunday, July 8, 2012

Texture Maps


original picture from cgtexture
Creating textures can be done in a Photoshop best done using high resolution pictures. To find high resolution pictures cgtextures.com is a good place to start. For my texture I chose a rough rock texture and began to alter it in Photoshop. To begin my first step was to offset my picture so it the pattern would continue when modeled. Then I began doing small changes like the color by laying a light color of brown and adding a soft light blending layer. From there many adjustment layers where added. I also added depth in between the top where the crack divides the rock. After I adjusted the color of the rock I then started to paint over it. Different brushes like a splatter brush were used to paint blood. To make the splatter look so unoriginal I erased some away. Many different tones like grey and dark brown were painted to the rock to make it look aged. Many different blending layers where used like lighten, lighten color, subtract, and saturation were used on all different paint layers. This was now finished and was my foundation for a texture that was now going to be put into a program called Crazy Bump to get different texture maps.  
normal map: based off lighting detal to show depth.
specular map: highlightsm what makes the object shine 


diffuse map: color map and basic texture

Monday, July 2, 2012

Beach: People Removal

Removing people from a image can be pretty easy once you get to know Photoshop and understands its tools. For this assignment we had to take a photo and remove them by using a mainly the spot healing brush. Once you have this tool there are a few optional like content-aware and proximity match. The main option to remove an object would be to use spot healing brush with content-aware on. After you get your removed piece you can then switch to proximity match to start to blend the piece and make it look like nothing was there at all. If that doesn’t work you can also use the clone stamp tool. In the image of the beach I removed plenty of people from the handful of people in the picture. The only issue I had was trying to remove the people near the net. The volley ball net came out blurry but it was I wanted to try anyway to see if I could do it. See if you can spot the people that I removed.

Tuesday, June 26, 2012

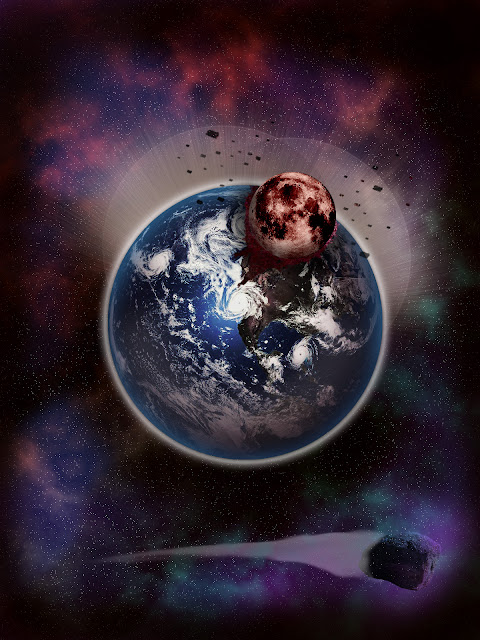
A remastered version of my other planet this matte painting is a lot better. Still I will provide a recap on how I achieved my final painting. I began with a document size around 1200 width 1600 height both in pixels with a transparent background. To the transparent background I filled it with white and low opacity. Then with a soft brush I scattered some black around. Next was to make some clouds. You can do this with render clouds under filter tab. I used difference clouds and is also located under the filter tab. I repeated this process at least three times and put them in their own layers. With my first set of clouds I added a gradient overlay to put my colors in. Next I began with the star layer. To do this in a good way you can also find a useful tool under the filter tab called noise. Make a new layer filled with black and under the filter tab find noise. You want to make sure Gaussian and monochromatic are checked. After you get your noise you want to use levels to bring out some brighter “stars”. You can do this process twice if you like. Still working on my atmosphere I wanted to add some extra color. I simply picked a color I wanted filled it in a new layer and with a soft brush I erased the color away. Lastly I took away from the edges painting a black edged outline because its outer space and black is necessary. To bring everything together that I had so far I added a color balance adjustment layer. Now working the planet, moon, and asteroid was my next goal. First I did these two light explosion circles by using a large hard brush and added an outer glow to it. Then to add to this explosion I added light rays. To get light rays you start by using a brush with dissolve checked. After you get a stroke you like add a radial blur from the filter tab. Also make sure you have zoom and best checked when using blur from the filter tab to get light rays. Now to the earth many different shades were added to it by using the brush tool. Some black, white, and blue shades where added to spots where needed. Lastly to finish up earth another color back was applied. The moon was transformed by using hue/saturation and color balance to get a fitting piece. Finally with the rock I thought a different way to use it. I used a clone stamp tool on it and started to paint the earth where it was colliding with the moon. I wanted to use the rock because it had a good texture that seem like magma and rock from the earth core. I also used the clone stamp from the rock to make the debris floating from earth. To make the colors fit hue/saturation and color was used once more. Lastly just to incorporate the rock I added it to the bottom flying past earth as it smashed into by the moon. I used a lasso tool to get the stream behind the rock. I then used the gradient tool to get colors I wanted, but I couldn’t get the colors to fit so I applied luminosity from the blending options. The rock is supposed to be a shooting star but that’s irony as earth is being destroyed.  

Monday, June 25, 2012

Planet Earth: Matte

This planet and its atmosphere were done by using some techniques in Photoshop. To begin with my clouds and star field a layer with a white background with 75% opacity was used. Then I used a soft brush with a preset of 1000% scatter and both axes checked. A filter was used to make clouds. Render and different clouds was used. I then set a layer style over it, gradient overlay, picked my purple and green colors, then set scaled to 50% with an angle of 135. To make the star layer a new layer filled with black was used. Another filter tool was applied this time noise. I added noise the amount around 10% with Gaussian and monochromatic clicked. I adjusted this layer using levels tools to bring amount a right of stars. Then I duplicated this layer again and adjusted this layer with levels.  To create extra stars for my purposes I used a custom brush with a layer style added to it. This created my background. The layers involving the earth involved blending layers like overlay. I added some extra color to my background too by adding a layer over with then erasing it.

Tuesday, June 19, 2012

Night to Day: Matte Painting


To begin my process I first removed the sky from the original background. I did this by using the color range on the sky and after that applied a refine edge for a better selection. Then I placed my selection in a layer mask. Next step was to remove the people and tent. The spot healing brush was used to accomplish the removal of the unnecessary items. While doing the spot healing process some of the railings from the building were taken away, to get back these railings the clone stamp was used with a soft brush. For the remaining development of turning this building into a night scene, adjustment layers were the basic fundamentals. Working with the building, first adjustment layer I used was the brightness to really bring down the shadows. Next was the levels and this brought out some of the mid-tones back into the image. I slightly applied some curve to the image to gather some more darkness. One major adjustment layer was the hue/saturation. This brought out more of the dark tan colors in the building and the green in grass. Lastly the photo filter was used to add a slight shade of violet over the image. Now working the sky was my next goal. I added brightness/contrast, exposure, and color balance were the adjustment layers I used to get a fitting picture to match the building and its lighting. Also I duplicated the moon to add to another layer where overlay blending mode was used.    
ORIGINAL DAY IMAGE

MY REDONE NIGHT SCENE


Monday, June 18, 2012

Meteor City Matte

For this matte we had to finish up a city being impacted by meteors. A few techniques used were clone stamp tool, custom brushes, and gradients.